I’m Tom, and I run The Chimney Experts INC. Repointing is the least dramatic repair I do and probably the most valuable one. All it means is taking out the mortar between your bricks where it has failed and packing new mortar back in. The brick itself is usually fine. Mortar is the part that is supposed to wear out first, because it is softer than the brick on purpose, and on a chimney in Upper St. Clair it has decades of weather working on it from three sides with nothing shading it. When those joints go, water stops running off your chimney and starts running into it. Call me and I will get up there and tell you whether yours has reached that point.
☎ Call (412) 440-5871 Get a Free Estimate
How to Tell Your Mortar Joints Have Failed
You do not need to be on the roof to catch most of this. Stand back from the house on a bright day, look at the chimney above the roofline, and check for these.
- Joints that have receded behind the face of the brick. A sound joint sits nearly flush with the brick. When the mortar has eroded, you get a shadow line, a visible groove where the joint used to be. From the ground it reads as the brick pattern looking unusually deep and dark.
- Mortar you can rub away with a thumb. If you can reach a joint safely from a ladder, press it. Mortar at the end of its life gives up sand. If it powders under light pressure, it is done holding water out.
- Cracking that steps through the joints. A crack that jogs along horizontal and vertical joints in a staircase pattern is following the weakest path through the wall, which is the mortar. That is a joint problem.
- Sand and mortar crumbs at the base. Grit collecting on the roof shingles at the foot of the chimney, or in the gutter below it, is your chimney shedding its joints.
- Open joints under the top overhang. The courses just below the crown and any projecting course take the most water. That is usually where the failure starts and where I look first.
- A damp patch or staining on the wall or ceiling near the chimney inside. By the time it shows indoors, water has been tracking down through open joints for a while.
- White chalky staining on the brick. That is efflorescence, salt carried out of the masonry by water moving through it. It is not the problem itself, it is proof water is getting in.
If you are seeing a few of these, the chimney is not in trouble yet. Repointing at this stage is straightforward masonry. Left another handful of winters, the water that gets past those joints starts breaking the brick faces off, and then you are paying to replace brick instead of mortar.
How I Repoint a Chimney
Repointing done badly looks fine for a year and then fails worse than what it replaced. Here is the actual sequence.
1. Cut the failed joints out to real depth
I grind and rake out the bad mortar to roughly twice the width of the joint, which on standard brickwork means somewhere around three quarters of an inch. That is not arbitrary. Mortar packed into a shallow scratch has nothing to grip and will pop out in sheets. I cut back until I hit sound mortar, and if that means going deeper in one spot than the one next to it, I go deeper.
2. Match the mortar to the brick, not to the hardware store
This is the part that separates a repoint that lasts from one that damages the chimney. Mortar has to be softer than the brick around it. When a joint takes a hit, whether that is water freezing in it or the whole stack expanding in summer heat, you want the mortar to absorb it and crumble, because mortar is replaceable. If the mortar is harder than the brick, the brick absorbs it instead, and the brick face breaks off. That is a much more expensive problem, and it is not reversible.
So I match the mix to what is already there. Older, softer brick gets a softer lime-heavier mix. Harder modern brick can take a stronger type. A straight high-strength mortar troweled into an older chimney because it sounded like the tougher choice is one of the most common ways I see a chimney get wrecked by a well-meaning repair.
I match the color and the joint profile too. A repoint should disappear into the chimney. If you can pick out the repaired section from the driveway, it was not matched.
3. Pack the joints and tool them
Mortar goes in in layers, packed tight so there are no voids behind the face. Then I tool the joint to the same profile as the original, usually a concave joint struck with a jointer. Tooling is not cosmetic. Pressing the joint compacts the surface and shapes it so water runs off it instead of sitting on a ledge.
4. Check the crown and the cap while I am up there
Repointing the stack and leaving a cracked crown above it is pointless, because the crown is where most of the water is entering. If the crown is broken I will tell you, and you can see how I handle that in this crown rebuild, start to finish. Same for caps over open flues, which I make the case for in why chimney caps matter.
5. Clean up, then decide about waterproofing
The masonry gets cleaned down so there is no smeared mortar left on the brick faces. Waterproofing is a separate call and it waits until the new mortar has cured. If we do it, it is a breathable vapor-permeable repellent, never a film-forming sealer. More on that in the FAQ below.
What Failed Mortar Looks Like Up Close
This is an Upper St. Clair chimney with the problem well advanced, and it is a good example of what I have been describing, because you can read most of it from the ground.
Look at the upper half of the face. The cracking does not run through the brick, it runs through the joints, stepping horizontally along a bed joint and then jogging vertically to the next one. That staircase pattern is the giveaway. It means the mortar is the weakest thing in that wall, which is what mortar is supposed to be, except these joints have gone past wearing out and started letting the chimney move.
Below the projecting course near the top, several joints have opened up wide enough to see from the driveway. That course is exactly where I expect to find it. A projecting band throws water outward, but it also gives water a horizontal surface to sit on, and the joints immediately under it take more wetting than anything else on the stack. Scattered across the face you can also pick out brick that has chipped or lost material where water has already been working behind the surface.
The caps on the three flues are doing their job, keeping rain out of the flues themselves. That is worth saying plainly, because caps are often where people stop. A capped chimney can still be taking on water through every open joint on all four faces, and that is what is happening here.
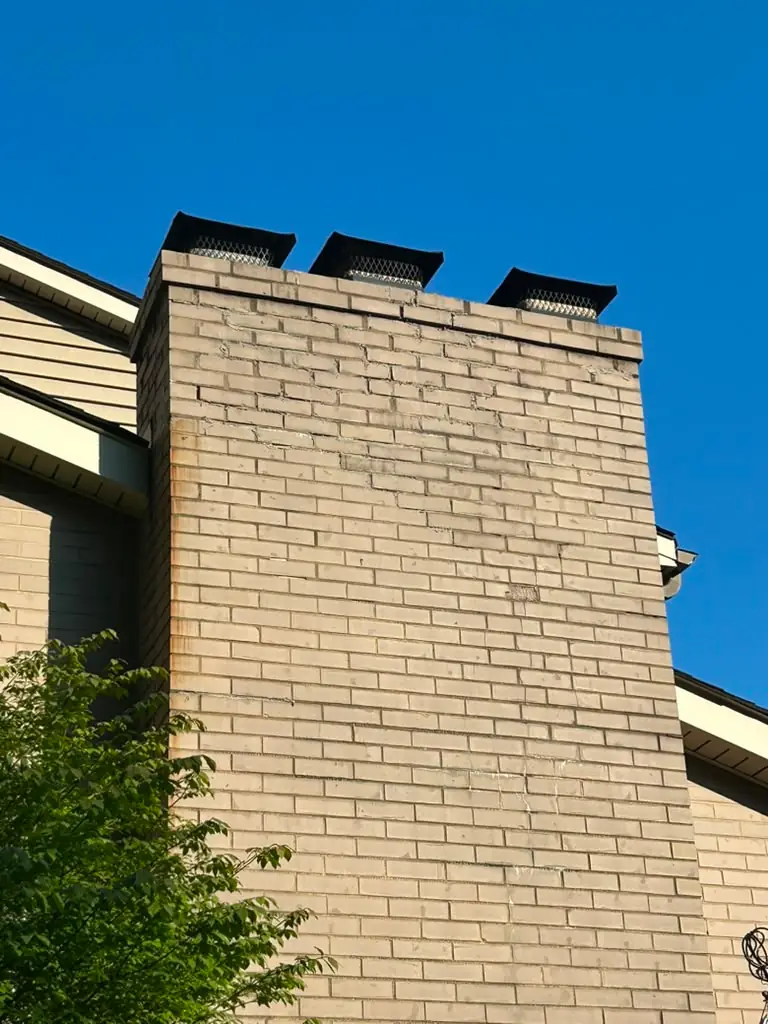
A chimney at this stage is still a repointing job, not a rebuild. The brick is largely intact and the stack is standing straight. Give it a few more winters of water getting into those joints and freezing, and the conversation changes to how much of it has to come down.
Repoint or Rebuild
Not every chimney with bad joints needs repointing, and not every chimney with bad joints can be saved by it. What I am reading when I get up there is how deep the failure runs. If the joints have eroded but the brick is still sound and the stack is straight, that is a repoint, and it is the repair that buys you the most years for the least money. When the mortar has washed out the full height of the stack, the brick faces are spalling on every side, or the chimney has started to lean away from the house, repointing it is throwing good money at a stack that needs to come down and go back up. I lay out how I make that call on the Mt. Lebanon chimney repair page, and the full range of masonry work is on my Pittsburgh chimney repair page.
Why Upper St. Clair Chimneys Reach This Point
Upper St. Clair filled in as a South Hills township through the postwar decades, so the housing stock runs heavily to colonials, ranches, and split-levels built when the township was growing rather than to the pre-war brick and stone you find up in Mt. Lebanon. That matters for one specific reason: it puts a very large number of chimneys here in the same age window at the same time. Original mortar on a house of that era has been in the weather for something on the order of forty to seventy years, and that is right where mortar joints stop doing their job. It is why I get calls on entire streets of similar houses within a few seasons of each other.
The mechanism that finishes those joints off is freeze and thaw. Water soaks into the mortar, the temperature drops below freezing, the water expands as it turns to ice, and it pushes the joint apart from the inside. Then it thaws, more water gets into the wider opening, and it happens again. Southwestern Pennsylvania runs that cycle across every winter and well into spring, and a chimney is the worst-placed masonry on the house for it. It stands clear of the roof with weather hitting it from all sides, it has no heated interior behind it holding it dry, and it stays wet longer than any wall. Soft or eroded joints are exactly what that process eats.
Geography does not help either. Upper St. Clair sits up on the ridge ground west of the Route 19 corridor, and the chimneys here are genuinely exposed, sticking up above open subdivision rooflines with nothing breaking the wind or the driving rain. That is a different situation from a chimney tucked under a tree canopy, which stays damp but sheltered. Here they just take it directly.
I work the whole South Hills, so along with Upper St. Clair I am regularly on chimneys in Bethel Park, Mt. Lebanon, Peters Township, Bridgeville, Scott Township, and South Fayette. If yours is showing open joints, get it looked at before another winter opens them further.
What an Estimate Looks Like
You call, I come out, and I get up on the chimney rather than judging the joints from the driveway, because from the ground you cannot see the crown, you cannot see the back face, and you cannot tell an eroded joint from a shadow. I go over the joints on all four sides, the crown, the top courses, the flashing at the roofline, and the flue. Then you get told what I found in plain terms, plus a written estimate that covers the joints that actually failed and nothing else. I would rather you be home for it so I can show you what I am talking about. The estimate is free either way.